
How to Submit Your Website to Google Search in 2026: Step-by-Step Guide
Submitting your website to Google Search requires verifying domain ownership inside Google Search Console, uploading XML sitemaps, and requesting URL inspection indexing for November 2026. Follow our step-by-step technical SEO guide to get your new site indexed rapidly.

Featured visual tutorial demonstrates adding website domain properties into Google Search Console for rapid search indexation in November 2026.
Submitting your website to Google Search is the primary technical SEO step required to ensure Googlebot crawls, renders, and indexes your web pages across organic search results. Without registering your site inside Google Search Console, web pages rely exclusively on external backlinks for discovery.
While Googlebot eventually discovers public web pages automatically, manually submitting your site via Google Search Console accelerates initial indexation from weeks down to hours. Registering your domain also grants access to organic search performance data, click analytics, and indexing coverage reports.
Evaluating website submission workflows requires analyzing WHOIS verification methods, XML sitemap generation, URL Inspection tools, and Indexing API protocols. Review our tested 5-step website submission blueprint for November 2026.
Following verified Google Search Console setup steps ensures your site URL records establish clean indexation signals from day one.
Overview: 5 Steps to Submit Your Website to Google Search for 2026
Comparing Google submission steps clarifies technical verification methods, sitemap submission fields, and URL Inspection tools. Review the summary matrix below to understand the site submission workflow.
| Submission Step | Technical Requirement | Indexation Impact |
|---|---|---|
| 1. Google Account Creation | Active Google account login | Grants access to Search Console |
| 2. Domain Ownership Verification | DNS TXT record or HTML file upload | Unlocks domain indexing controls |
| 3. Search Console Configuration | Domain vs URL Prefix setup | Enables site-wide reporting |
| 4. XML Sitemap Submission | Submit /sitemap_index.xml URL | Guides Googlebot crawl path |
Detailed Breakdown: 5 Steps to Submit Website to Google
Following our visual step-by-step submission guide guarantees successful domain verification and rapid page indexation. Explore each technical phase below to register your domain with Google Search.

Step-by-step submission flowchart illustrates domain property creation, sitemap submission, and URL inspection workflows.
Preparing domain DNS credentials prior to starting verification streamlines registration into a 10-minute setup process.
Step 1: Create or Sign Into Your Primary Google Account
Creating or signing into a dedicated Google account establishes administrative access to Google Search Console and webmaster tools. Using a central business Google account ensures your domain management permissions remain organized.

Google sign-in interface collects email credentials to initialize Search Console profile registration.
Using a corporate Google Workspace address guarantees team members can manage site indexing permissions securely.
Enabling two-factor authentication on your Google account shields your Search Console property from unauthorized access.
Navigating to Google Search Console (search.google.com/search-console) opens the property setup screen.
Step 2: Verify Your Website Ownership (DNS TXT vs HTML Tag)
Verifying website ownership proves to Google that you have administrative authority over the registered domain name. Google offers multiple verification methods including DNS TXT records, HTML file uploads, HTML meta tags, and Google Tag Manager.

Ownership verification panel displays DNS TXT record strings and HTML file download options.
Selecting Domain verification (DNS TXT record) verifies all http, https, www, and non-www subdomains simultaneously.
Copy the generated TXT record string and paste it into your domain registrar’s DNS management dashboard (e.g. Cloudflare or Namecheap).
Click Verify in Search Console once DNS records propagate across global nameservers to confirm ownership.
Step 3: Configure Google Search Console Dashboard Settings
Configuring Search Console dashboard settings unlocks real-time organic traffic monitoring, index coverage reports, and mobile usability alerts. Reviewing your performance dashboard regularly highlights technical site errors before they impact rankings.

Google Search Console main dashboard visualizes total search clicks, total impressions, average CTR, and average SERP position.

Search performance report filters organic search queries by device type, country location, and search appearance.
Setting up email alert preferences ensures Google notifies you immediately regarding manual security actions or crawling errors.
Adding team member email addresses under Users and Permissions enables collaborative technical SEO management.
Step 4: Generate and Submit Your XML Sitemap
Submitting an XML sitemap provides Googlebot with a structured blueprint of all publishable URLs on your website. XML sitemaps outline page creation dates, last modification timestamps, and image counts across your site architecture.

Sitemaps submission menu input field allows entering sitemap_index.xml for automated crawling.
Generate clean XML sitemaps using plugins like Rank Math SEO or Yoast SEO, which auto-update whenever new posts publish.
Enter your sitemap URL extension (typically sitemap_index.xml) into the Sitemaps input field and click Submit.
Confirming Success status inside the Sitemaps report verifies Googlebot successfully fetched and parsed your URL list.
Step 5: Request Indexing for Specific URLs via Inspection Tool
The URL Inspection tool inspects live webpage URLs, testing Googlebot accessibility and submitting direct indexation requests. Requesting indexing for newly published posts queues URLs for priority crawl processing.
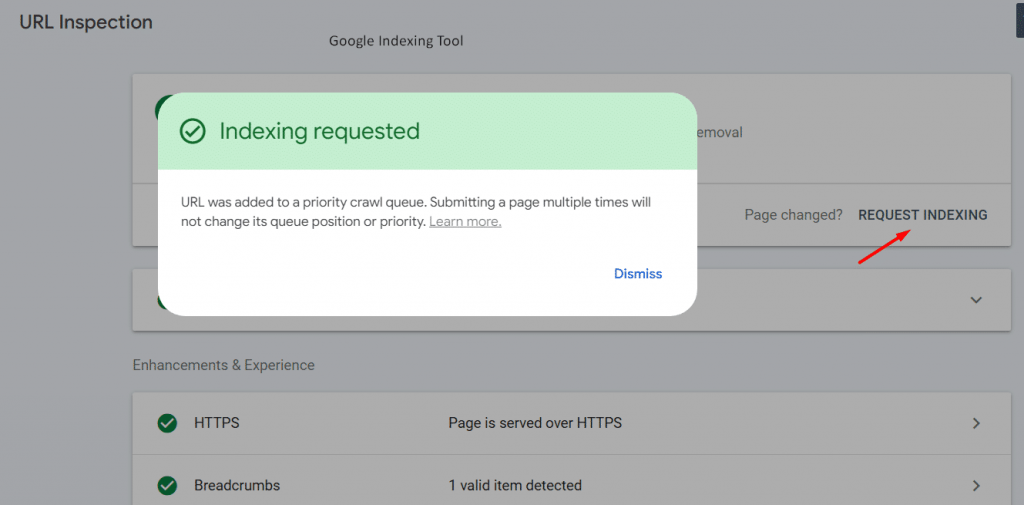
URL Inspection search bar permits pasting specific page URLs to test live Googlebot rendering and index eligibility.
Click Test Live URL to verify that your webpage returns HTTP 200 OK status without canonical tag errors.
Click Request Indexing to queue your live URL into Google’s priority crawl queue for rapid processing.
Utilizing the URL Inspection tool after major content updates encourages Googlebot to re-index fresh copy immediately.
How Google Indexes Websites: The Crawl & Render Process
Understanding Google’s 3-stage indexing process (Discovery, Crawling, Rendering) helps webmasters troubleshoot indexing delays effectively. Googlebot systematically processes web pages before storing them in the search index.
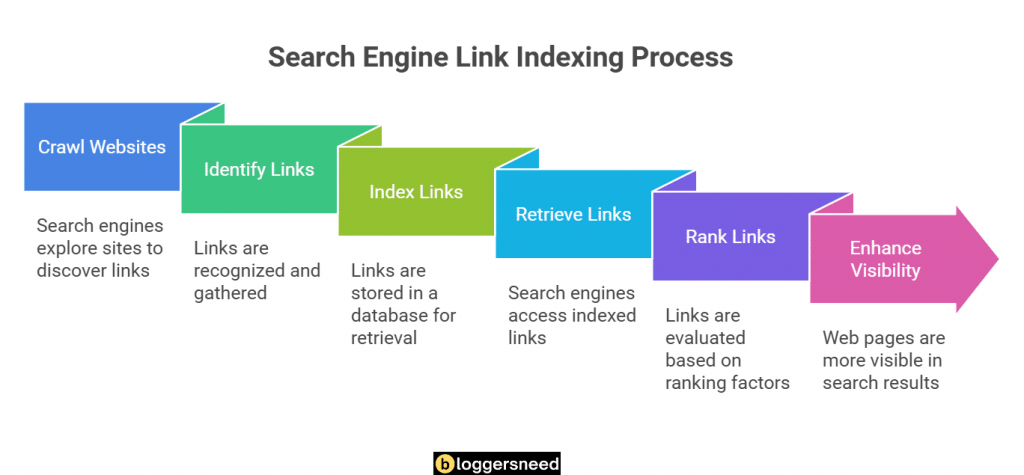
Google indexing process diagram outlines link discovery, headless Chrome rendering, and index storage stages.
Discovery occurs when Googlebot discovers your URL via sitemaps, internal links, or external backlinks.
Crawling fetches webpage HTML files, while Headless Chrome rendering executes JavaScript to process final DOM layouts.
Indexation stores rendered page content inside Google’s search index database, making URLs eligible for SERP rankings.
Troubleshooting Common Google Indexing Issues
Troubleshooting Google indexing issues requires inspecting Search Console Page Indexing coverage reports to identify crawl errors. Resolving canonical errors and noindex directives restores indexing eligibility.

Page Indexing coverage report categorizes non-indexed URLs by specific error reasons like Excluded by noindex tag.
Reviewing non-indexed URL categories helps webmasters fix canonical tag misconfigurations and robots.txt blocks.
For more detailed technical solutions, check out our guide on fixing common Google indexing issues.
Fixing soft 404 errors and low-quality thin content pages ensures your crawl budget focuses on high-value URLs.
Resolving Discovered – Currently Not Indexed Status
The “Discovered – currently not indexed” status indicates Googlebot detected the URL but has not yet allocated crawl budget to render the content. This status typically arises when internal linking architecture is shallow or server response times slow down crawl velocity.
Strengthen internal links from high-authority pages and check our guide on best website indexing services for speedier discovery.
Improving page loading speeds and eliminating duplicate canonical tags encourages Googlebot to prioritize the URL in subsequent crawl queues.
Fixing Crawled – Currently Not Indexed Quality Filters
A “Crawled – currently not indexed” notification signals Googlebot successfully rendered the page but determined the content lacks sufficient topical depth or uniqueness. Google avoids indexing pages that closely duplicate existing content or offer low informational value.
Analyze your inbound link profile with best backlink analyzer tools to understand domain authority signals.
Expanding the article with original practitioner insights, bespoke comparison tables, and structured entity definitions resolves the quality filter.
Handling Page with Redirect and Canonical Mismatches
Redirect and canonical discrepancies occur when your XML sitemap submits destination URLs that forward visitors elsewhere via 301 redirects. Submitting redirecting URLs wastes crawl allocation and confuses search engine indexation algorithms.
If you manage a WordPress site, refer to our walkthrough on how to install a plugin on WordPress to set up Rank Math for automated canonical auditing.
Ensure every URL listed inside your XML sitemap responds with an HTTP 200 OK header and matches its own self-referential canonical tag.
Frequently Asked Questions About Submitting Websites to Google
Read clear answers to manage website indexation smoothly and avoid recurring crawl errors. Understanding Google Search Console workflows guarantees that your freshly authored content achieves fast search discovery.
Is submitting a website to Google free?
Yes, creating an account and submitting websites through Google Search Console is entirely free for all webmasters. Google provides complimentary access to URL inspection, sitemap submission, Core Web Vitals reports, and organic search performance analytics.
How long does it take Google to index a new website?
Google typically indexes new websites within a few days to two weeks following verified Search Console submission. Websites with established external backlinks and well-structured XML sitemaps often achieve faster indexation within forty-eight hours.
Can Google index my website without submitting to Search Console?
Yes, Googlebot discovers websites automatically by following inbound hyperlinks from other previously indexed pages across the web. However, manually submitting via Search Console accelerates crawl discovery and provides direct visibility into technical indexing errors.
How often should I resubmit my XML sitemap to Google?
You only need to submit your XML sitemap URL once to Google Search Console. Googlebot periodically revisits the sitemap endpoint automatically to detect newly published articles and modified page timestamps.
Why did Google index my homepage but not inner blog posts?
Google often indexes root domains first while evaluating domain-level trust and allocating initial crawl budget. Inner pages remain unindexed if internal linking is weak, content quality appears thin, or pages inadvertently carry noindex meta robots tags.

I’m Abdullah Prem, a passionate blogger with over 10 years of experience. I created BloggersNeed to produce high-quality, easy-to-understand articles, guides, and tutorials that help people start their blogging journey. Specializing in WordPress, Hosting, Themes, and online money-making strategies, I’ve been featured on leading tech platforms such as Tech.co, Cloudways, Business2Community, Leadpages, GoodFirms, and ShareThis. BloggersNeed.com